WordPress Usage Guide
WordPress is designed to be user-friendly and self-explanatory. The following is a brief guide to some of its features to get you started.
- Logging In
- The Dashboard
- Posts
- Quick Draft
- Pages
- Media
- Comments
- Users
- Menu
- Widgets
- Slideshow
- Galleries
- Events
- Contact Form Database
Logging In
To access the admin end of your website, you will first need to login. To login to your site, go to your home page in the browser and type “/wp-admin” at the end of the URL. Here’s an example of what it should look like:

This will take you to the login screen. Type in the username and password that were provided to you and click “Login”. This will take you to the dashboard.
The Dashboard
When you log into WordPress, you are taken to your Dashboard. This is your base of operations for the entire site.

To the left of this main area there is a list of links that is going to be visible from every page in WordPress (seen below). This list of links is customizable, but Dashboard should always be there. When in doubt, click on “Dashboard” and you will be brought back to this “home base” page.
The main feature of the Dashboard is the At a Glance section. As you can see below, it keeps a tally of how many posts, pages, comments, etc., your site has. Each item named is a link. Clicking on “1 Post,” for instance, will take you to a new page with a list of everything you’ve posted, and options for editing the posts. The other links for Pages, Categories, Tags, etc., work similarly. These will be addressed in more detail below.
Posts
Clicking on the “1 Post” link from the dashboard takes you to a list of your existing posts:

Clicking on an already-existing blog post will bring it up for editing. The features involved in editing a pre-existing blog post work just the same as for editing a new blog post. (This will be discussed below.)
Hovering the mouse over a post listed on the Edit Posts page will bring up a series of buttons, “Edit, Quick Edit, Trash, View.”
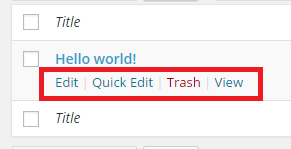
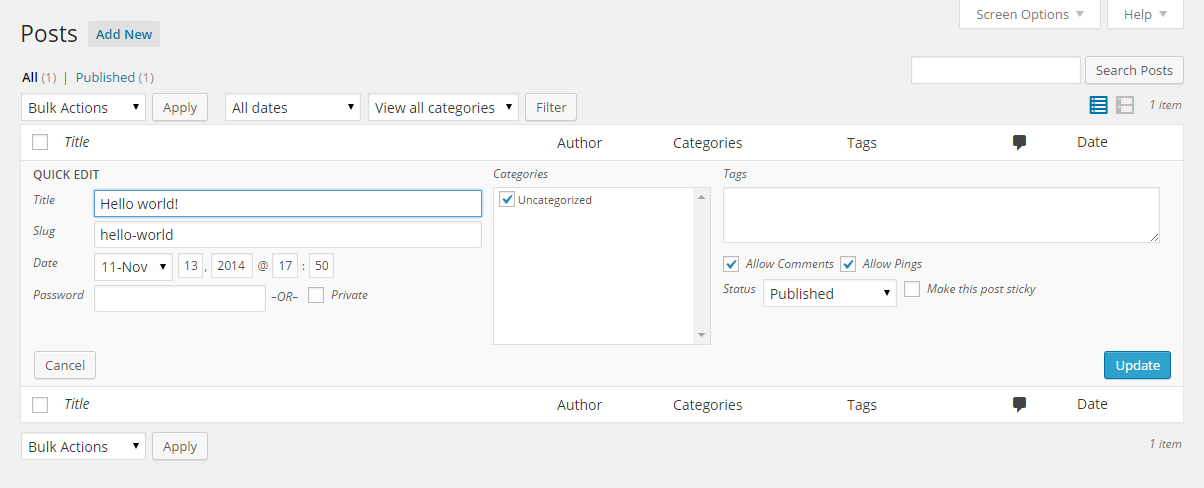
Edit brings you to a screen where you can edit all elements of your post. (This is the same screen that comes up when you click directly on the post name.) Quick Edit allows you to change things like the post’s title, tags, date, etc., without changing the actual content. Here’s a view of the Quick Edit screen:
The “Delete” option is self-explanatory and the “View” option brings that post up on the screen so you can see it just as your readers will.
Up at the top next to “Edit Posts” is the “Add New” button for when you’re ready to add new posts.

It will bring up this screen:
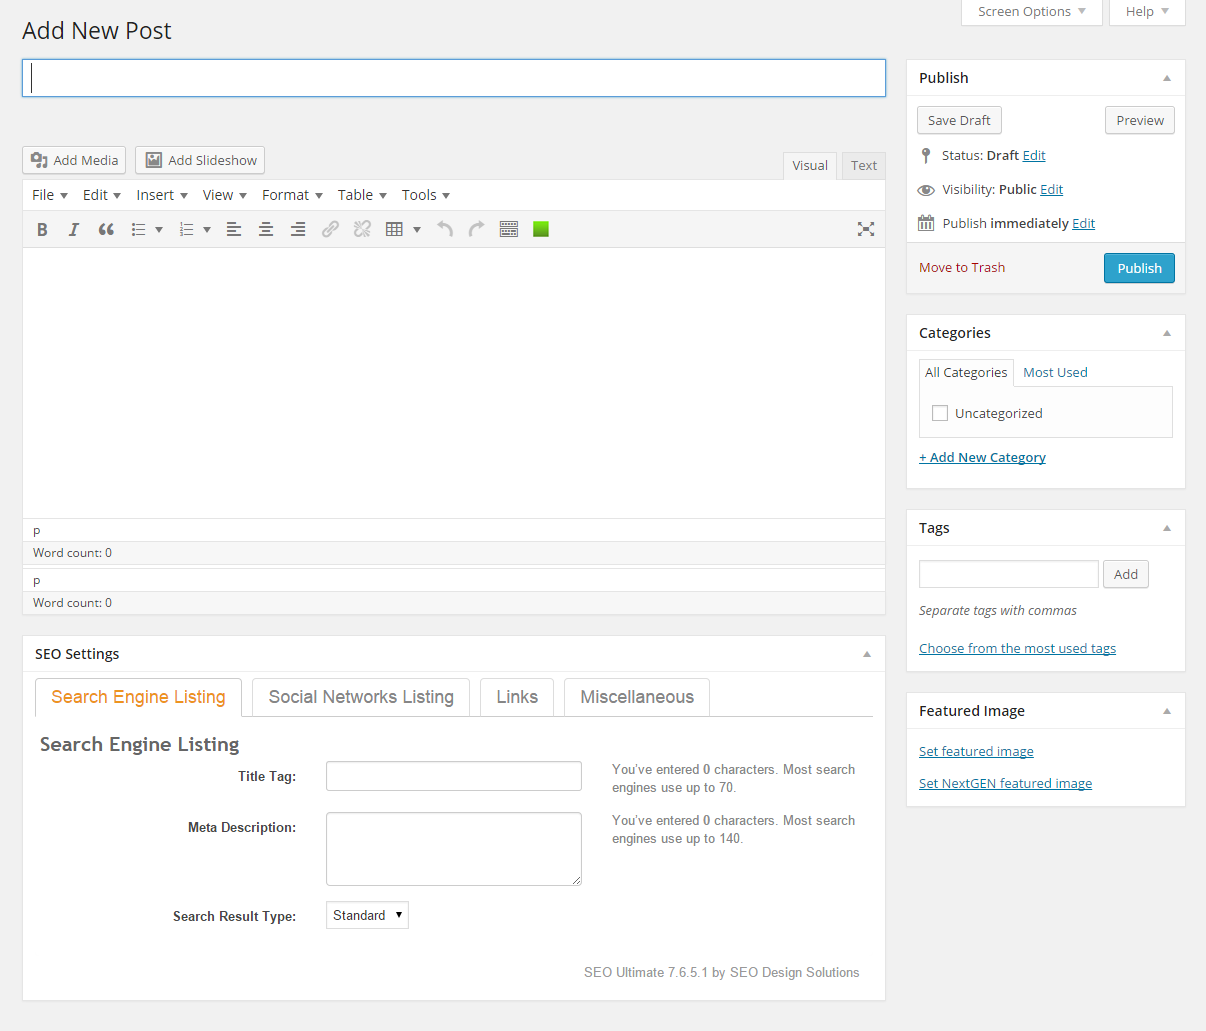
Once you choose a title, a new feature will appear just below the title:

The Permalink is the address that a person can copy and paste directly into their web browser. WordPress automatically generates a permalink based on your blog name, date, and post title, but if you want to change it (for instance, you could have it say “post #1” rather than the lengthy “here-is-where…” as shown above) click on the Edit button and type your new choice into the box that appears.
There are two ways to categorize your blog entries: tags and categories. The boxes for these appear on the right of the Edit Posts page.
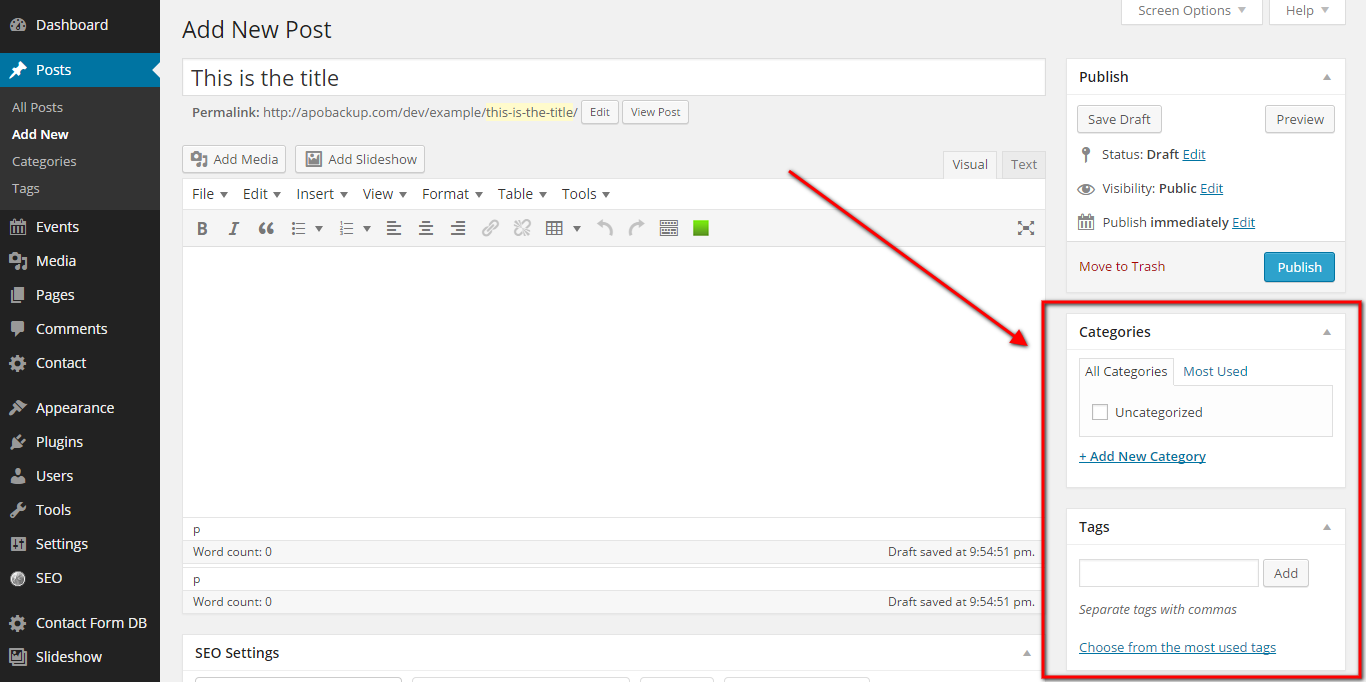
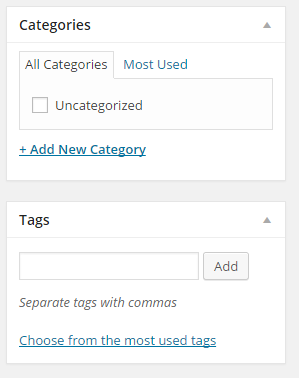
Categories give the more general topics you will be discussing, whereas tags are more specific. You might have a category of “Farm Hands” and a tag for each employee’s name. Using these just enables blog readers to more easily find the content they are looking for.
Quick Draft
If you don’t have the time or attention to spare to making a full blog entry, but want to get some information saved immediately, Quick Draft is a very useful tool. It can be found on the Dashboard, on the right of the screen.
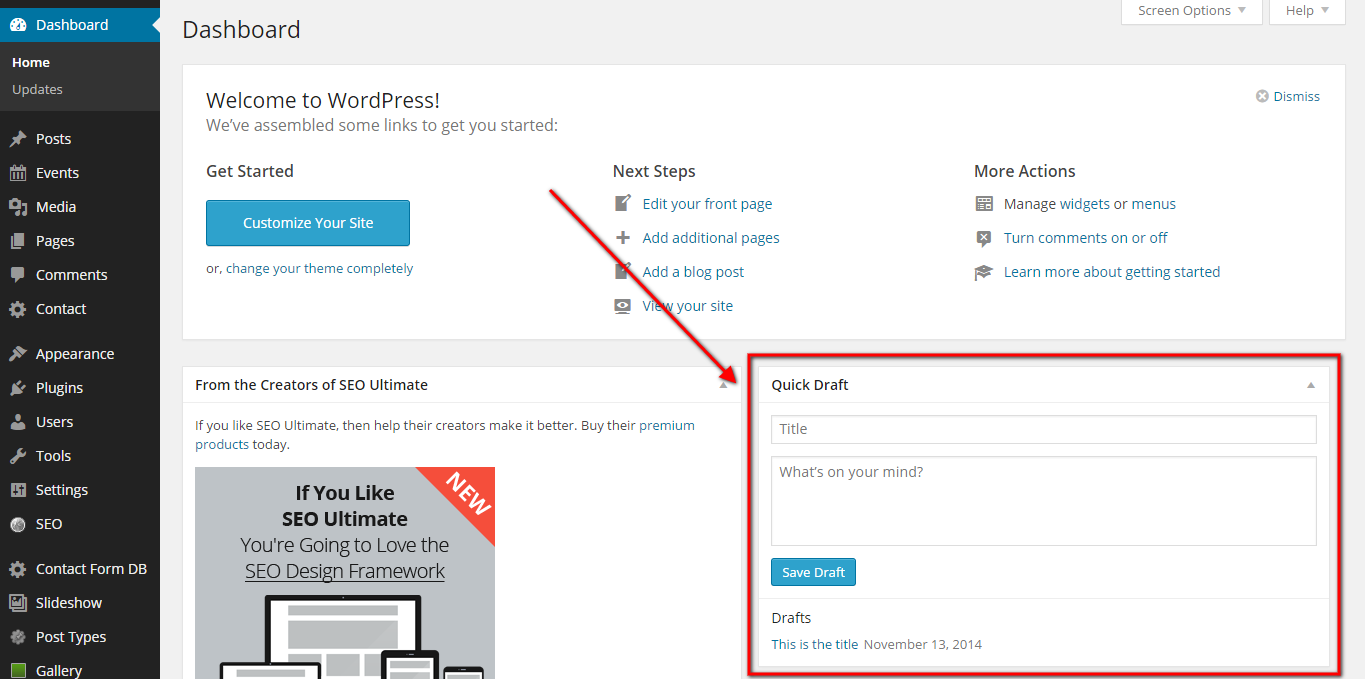
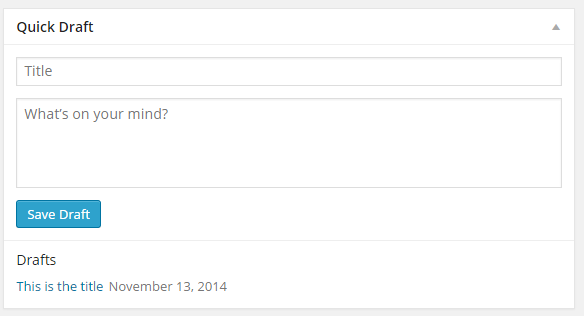
Simply type in your post’s title and content as shown, and then click Save Draft. The information you entered is saved for quick publishing when you are ready.
You can return later and edit or publish this post by choosing “Posts” from the Dashboard.
Pages
The next feature shown on the Dashboard is the Pages link. Clicking on that link brings you to a summary list of all your site’s pages. Each page will have the same links as in your Posts section: Edit, Quick Edit, Trash, and View, which work the same way. It’s important to note that the Quick Edit is a little different for pages:

The “Parent” page field on the right determines where the page will show up in your site’s arrangement. In the example menu below, Home Page is the parent page of About Us and Contact Us, and About Us is the parent page of Our Staff and Our Buildings.
- Home page
- About Us
- Our Staff
- Our Buildings
- Contact Us
- About Us
There is no limit to the number of pages you can have under one Parent page, or to the size of a chain of Parent pages, getting more and more specialized as you go down the line. This allows your site to be highly customizable.
When you create a new page, the screen will look like this, very similar to when creating blog posts.
The important difference to note is that the first field (which says “About” in this instance) will be the title of the entire page, not just of a single blog post.
To create a new page, select Pages on the left side of your screen, and then select Add New. This will show up under the Pages button.
Creating a new page will take you to a blank page editing screen. Start by entering a name for the page, for example “About” or “Bio” or “Home”.
When entering your page’s content, stay on the Visual editor unless you are familiar with HTML code.
Above the page editing box are many icons. Hovering over these will tell you which each icon does, but the first will probably be the most used. It allows for you to upload and insert images onto the page. Click the icon and follow the instructions to either select an image on your computer to upload, or pick from already uploaded images in the Media Library.

When you have edited the content to your satisfaction, look to the right and find a button that says “Preview Changes”.

This will show you what your newly created page will look like within the context of your site. You can then edit as needed until you are ready to publish the new page.
Media
It’s important to know how to upload media and place it in your posts and pages. Whether you are creating a new page or post or editing an existing one, adding media works the same way.

This image is a cut-out of the top-left portion of the image used above to illustrate creating and editing a Page. Notice where it says Add Media, this is where you go to add media to your posts and pages.
Media that has been uploaded can be managed using the Media link in the right menu. From this screen you can view all media in your library and perform actions like deleting, sorting and filtering, adding new media, etc.
Clicking Add Media will take you to the Insert Media screen. From here you can browse your computer for images to upload, or browse already uploaded images in your Media Library.
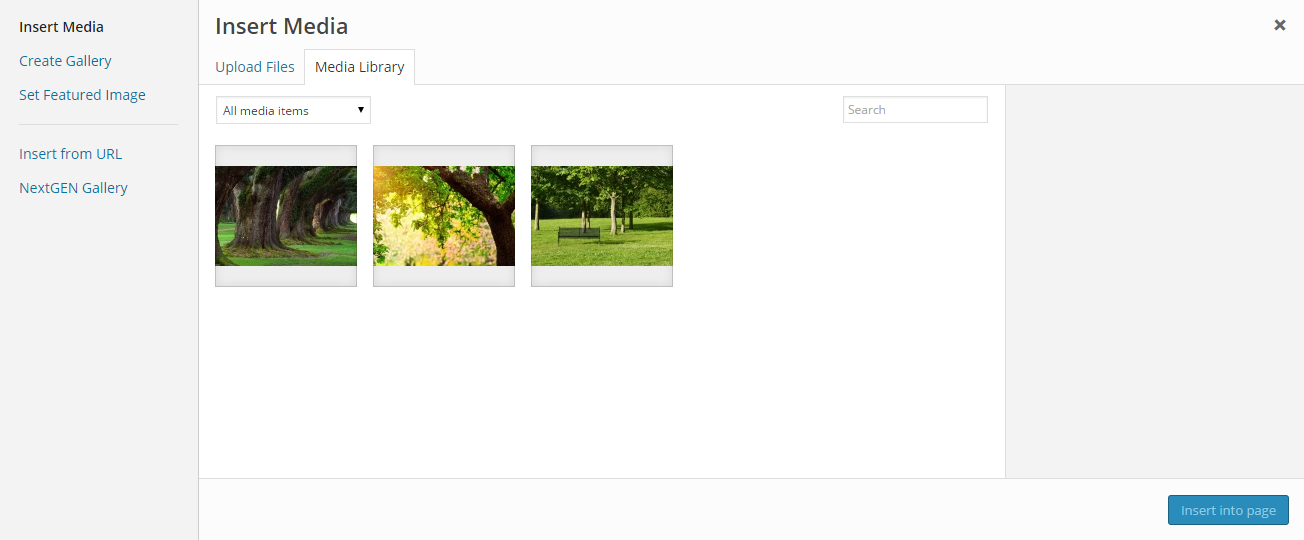
Once you have selected an image to insert into your page or post and have uploaded it, you will have a few options about how exactly it is inserted.
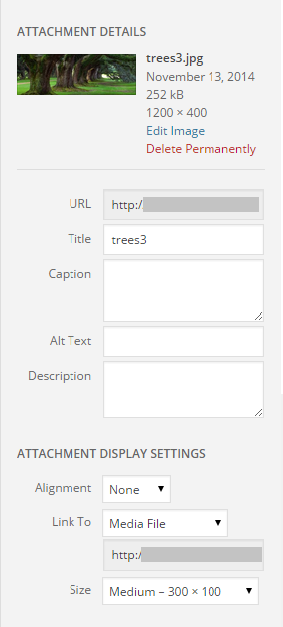
“Title” – this is an optional text that will display when you mouse over the image.
“Caption” this is an optional text that will display as a caption at the bottom of the image.
“Alt Text” – this is an optional text that will display in place of the image should the image not display.
“Description” – this text won’t display, it is simply there for your organization as the admin.
“Alignment” – this selection will determine where the images is placed on the page in relation to the text. Selecting “None” will give the image its own line.
“Link To” – this selection will determine what the media will link to. If you uploaded a file, you probably want it to link to the file itself. If you uploaded an image, you can have it link to the image file, or have no link at all.
“Size” – this selection will determine the size of the image. Any selection other than “Full size” will be resized by wordpress.
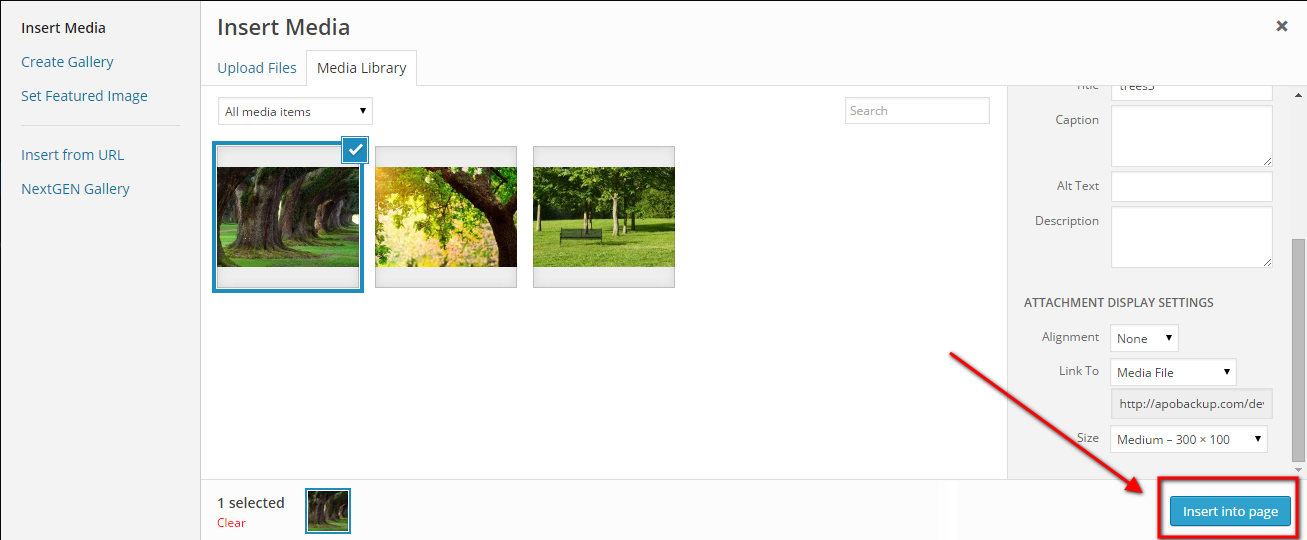
When you’re ready to go, click the Insert into page button. If you’re editing a post, the button will say “Insert into post”.
Comments
The next Dashboard link to discuss is Comments. This link brings you to all comments that have been made, whether they have been approved yet or not.

If you hover your mouse over a comment, you will get a more extensive list of options than for posts or pages: Approve | Reply | Quick Edit | Edit | Spam | Trash. (If a comment has already been approved, it will say “Unapprove” instead of “Approve”.)
Approve allows the comment to appear on your site as-is. Spam reports that comment as spam, and it is then not posted. The Delete, Edit, and Quick Edit links work as previously, with Quick Edit again having some different features. Clicking on Quick Edit brings this up:
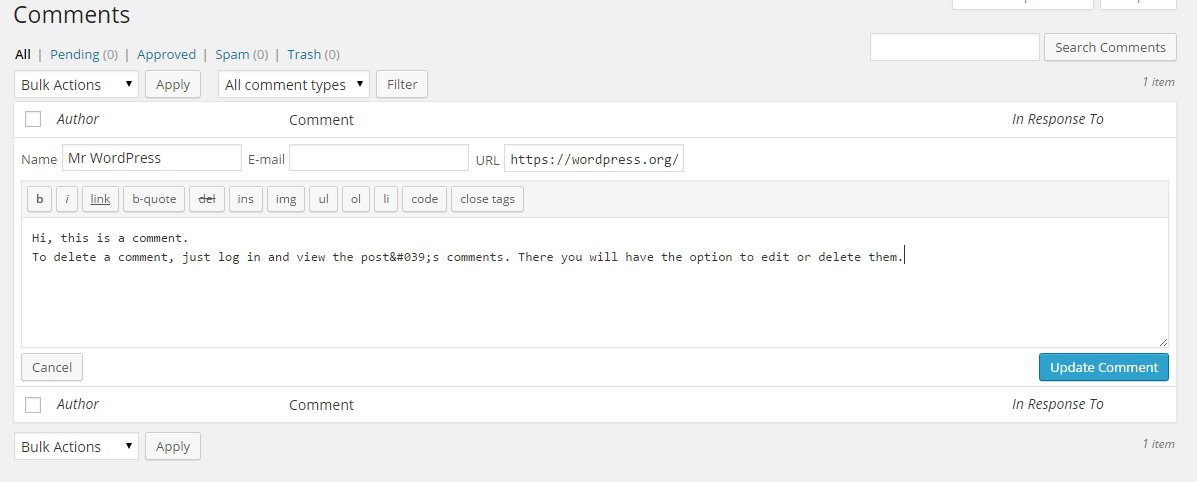
You are then able to edit the comment. This could be useful if the comment has privacy-sensitive information, typos, inappropriate content, etc., but you still want to publish it.
The Reply link opens a reply window directly below the comment.
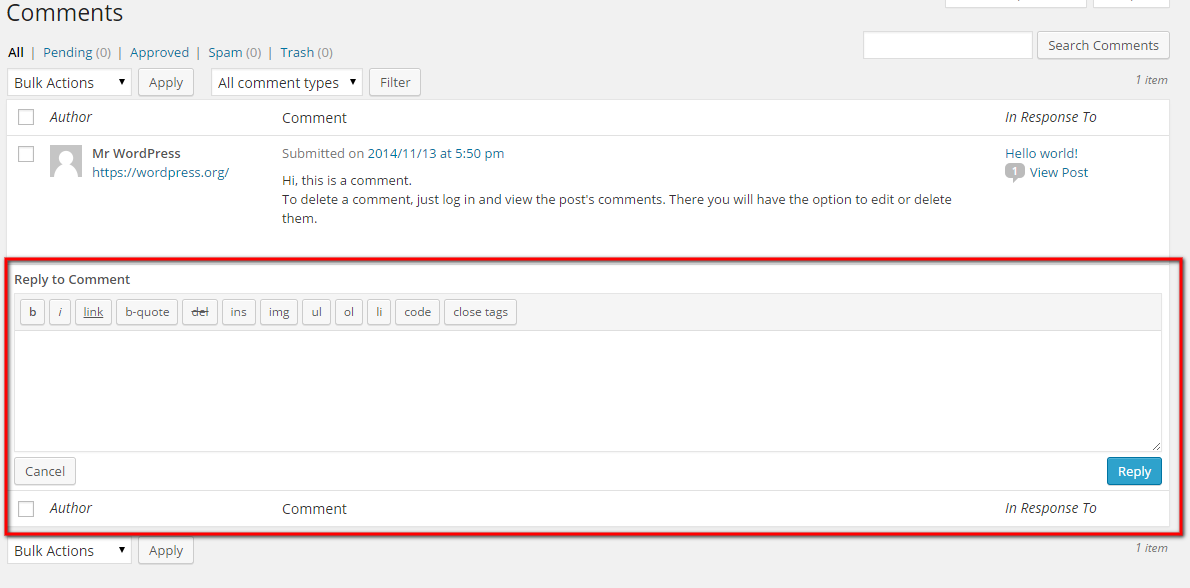
This allows you to see the person’s comment while you reply, ensuring you don’t miss anything. Your reply will then be properly displayed under the first comment at the original page.
A final note on comments: If you’d like to view only approved, pending or spam comments, use the links below “Comments” on your Dashboard.

Users
There is a selection for Users in the left menu which will allow you to create new user profiles as well as modify existing ones.

Click on a user to view/edit their profile, or click on Add New to create a new user profile. When adding a new user profile, the Username, E-mail and Password are required.
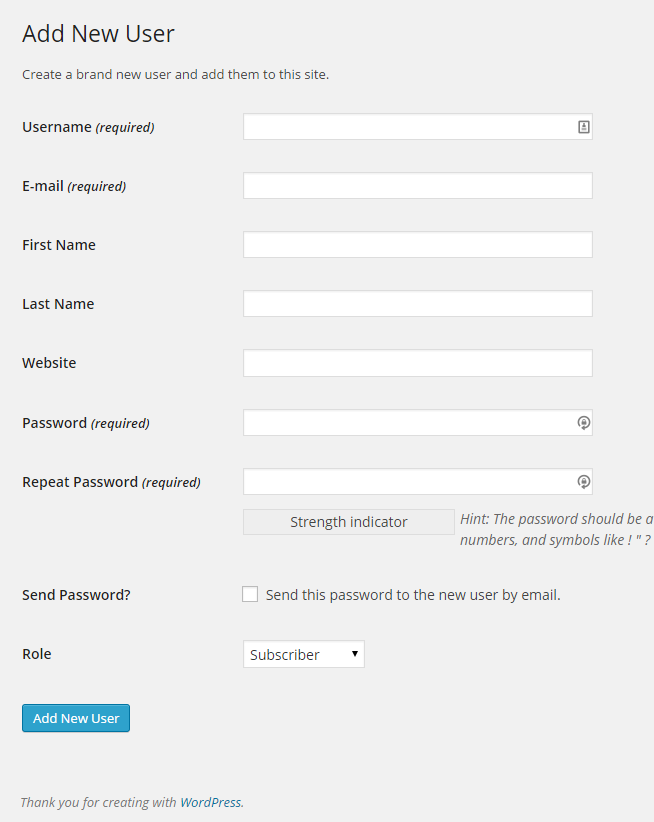
Choose a password for the user (or have them type it in if they are with you) then you can choose to have an email sent to the new user with their information.
Select the Role that you want the new user to have. This will determine how much access they have to the administrative side of the website, and what they are able to do. For example, I subscriber can’t create or edit content. A contributor can add content but can’t edit or remove content, etc.
Click Add New User and you’ve created a new user.
Menu
To edit the menus, go to the Menu section under Appearance on the left menu. To move items around, simply drag them to the desired location within the menu.
To add new items to the menu, find the Pages section on the Menus page (it will usually be down on the left) and find the page(s) you want to add. Select them, and click Add to Menu.
The new menu item will be added to the bottom of the menu. You’ll need to drag it and place it where you want it to be in the menu.
Click Save Menu in order to save any changes.

Widgets
Widgets are used to place content in the sidebar portion of the website, though sometimes they can be used for other areas of the site, depending on how it was setup.
The widgets screen is accessed under Appearance –> Widgets and looks like this:
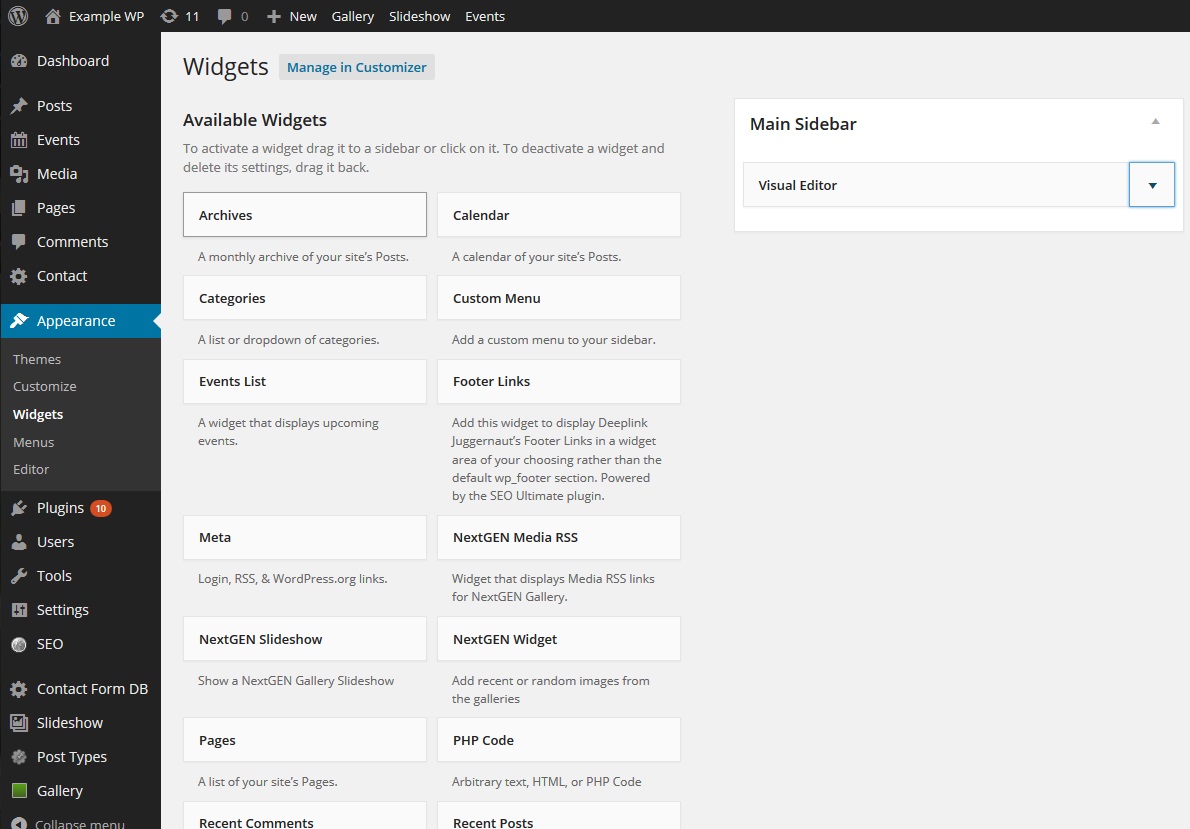
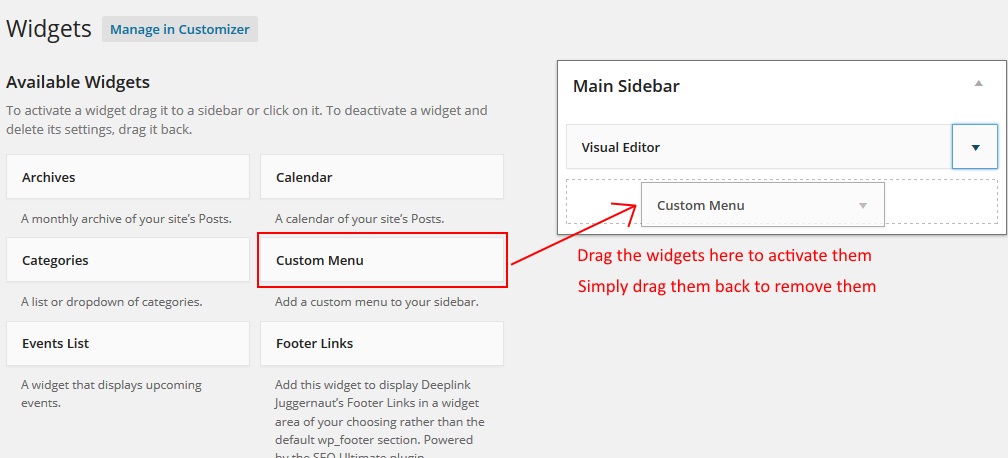
To activate a widget in a sidebar, drag the widget you want over to the sidebar area. If you want to remove a widget, you simply drag it back to the left.
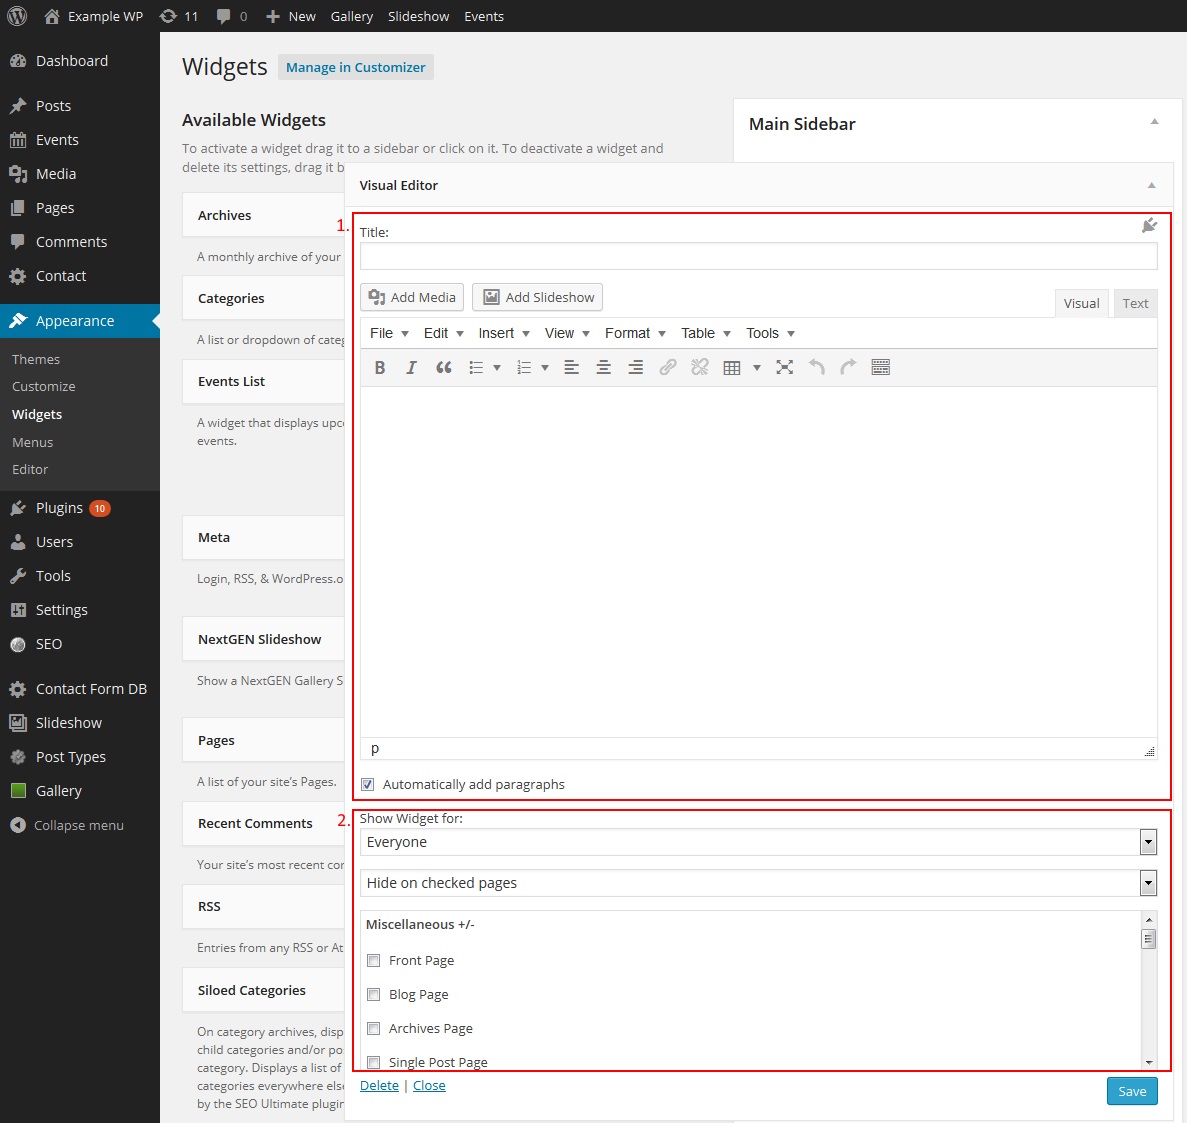
Clicking on the widget name will open it for settings and content modification. Each widget will have different settings and available content that can be edited. Generally most widgets will have a title field which is optional. On websites that we build, there will be an additional area at the bottom of each widget that gives the ability to choose which pages of the site the widget will appear on.
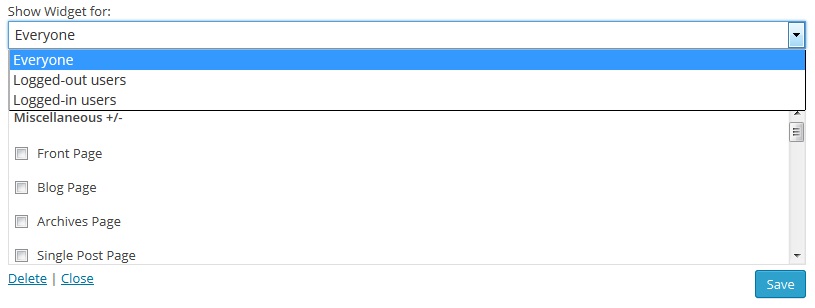
First option will let you choose whether to restrict the widget to logged-in or logged-out users:
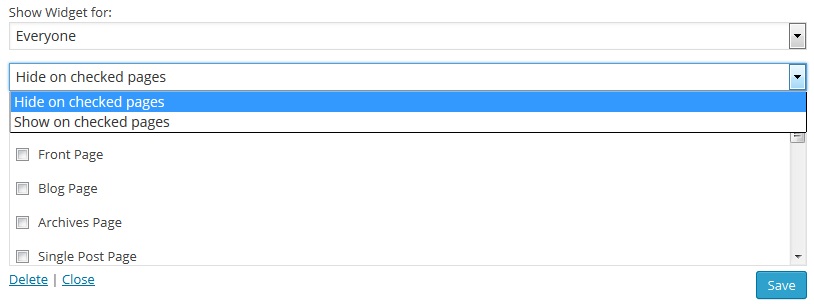
You also have the option of whether the pages checked off will be shown or hidden:
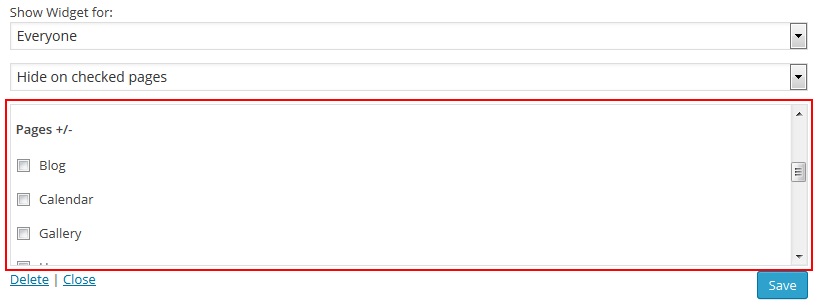
This last section will be a list of pages on the site which can be checked in order to show or hide the widget on those pages:
Slideshow
To add or remove images from your slideshow, go to the slideshow menu item in the left menu and select Edit Slideshow. On the slideshow edit page, you will see thumbnails of the various images currently in your slideshow.
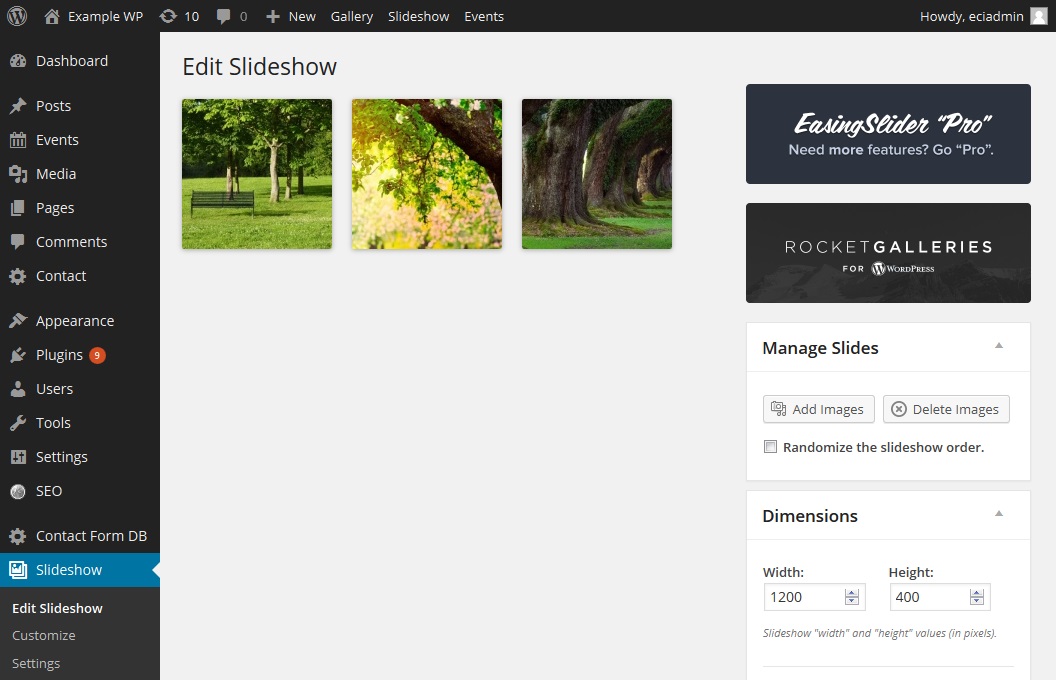
To add images, click the Add Images button and go through the steps to either select an image that has already been uploaded to the site and is in the Media Library, or upload new images from your computer.
You can edit the title and alt tags of your slideshow images by clicking on the thumbnail:
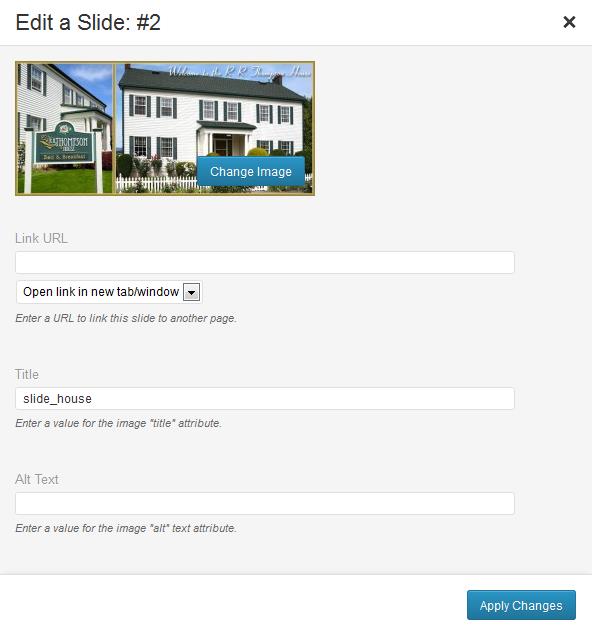
You can also add a link to the image so that when viewing the slideshow, clicking that image will take the person to a set page of the website, or out to another website. Be sure to set whether you want the link to open in the same window or a new one.
There are also many configuration options available for the slideshow:
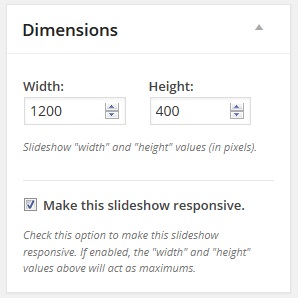
Here you can set the width and height of your slideshow. This will usually be set already and shouldn’t be changed unless you need to.
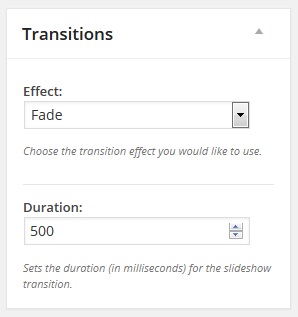
Here you can select the effect that the slideshow uses to change between images. The options are “Fade” and “Slide”. The duration is the amount of time it takes for the transition to occur. The duration is set in milliseconds (so 500 is half a second, 1000 is 1 second, etc.).
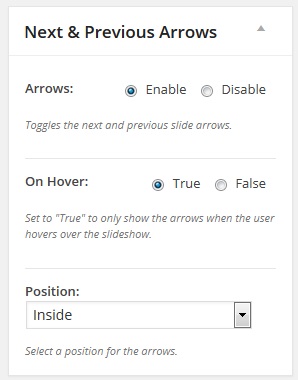
Here you can choose whether to have navigation arrows and whether those are inside the bounds of the slideshow or outside. Also whether they are always visible, or only visible when the slideshow is moused over.
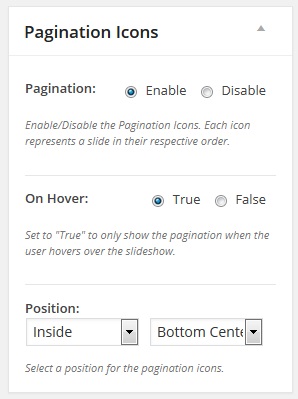
Pagination icons are the little dots that show with slideshows indicating how many slides there are. You have the same control options available as with the navigation arrows.
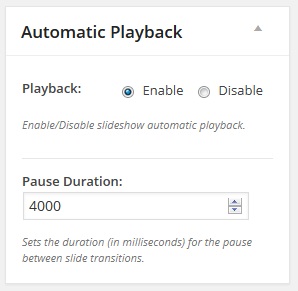
This sets whether the slideshow plays automatically. Disable playback to create a fixed slideshow that required manual interaction to move between slides. The pause duration is how long the slideshow stays on each slide and is done in milliseconds like the transition duration.
Galleries
Managing Galleries
To manage existing galleries, go to the left menu and find Gallery then select Manage Galleries to bring up a list of all the existing galleries. Click on the one you want to manage to bring up the management screen:

Now you will see a list of all the images in the gallery and the options for each. You can remove images, add descriptions, add tags, even check the “exclude” box to leave the image in the gallery, but not have it show on the site.
The “Description” box (marked with red above) is where you type whatever text you want to appear with the image when viewed on the site.
Adding Images to Galleries
To add images to a gallery, click “Add Gallery / Images” from the left menu.
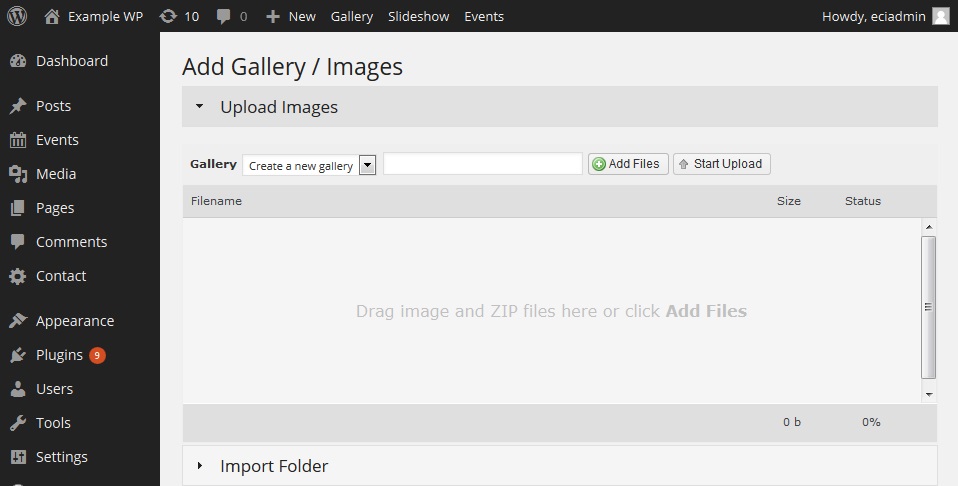
Select the gallery you want to add images to with the dropdown menu. The “Add Files” button will bring up a browse window so you can browse to the images on your computer that you would like to add. Then just click “Start Upload” to add them to the gallery.
Creating a New Gallery
To create a new gallery, simply leave the Gallery selector at “Create a new gallery” as shown above and type in the name of your new gallery to the left. Then add files and start upload just as you would for an existing gallery.
Inserting a Gallery into a Page
To insert a gallery, go to the page where you want to add it and open the edit screen.
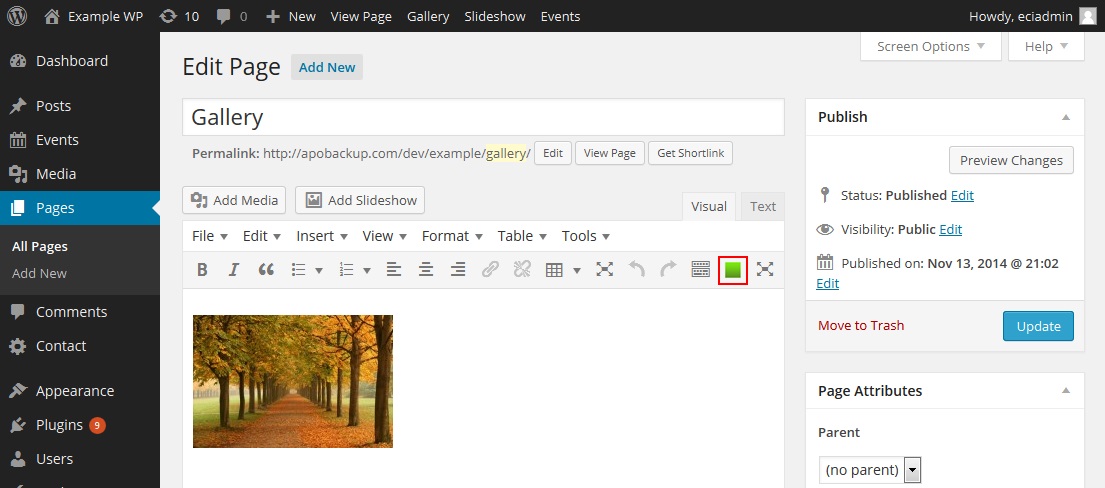
The button marked with red is “Add NextGen Gallery” button for inserting galleries into pages. Click it to bring up the insert screen:
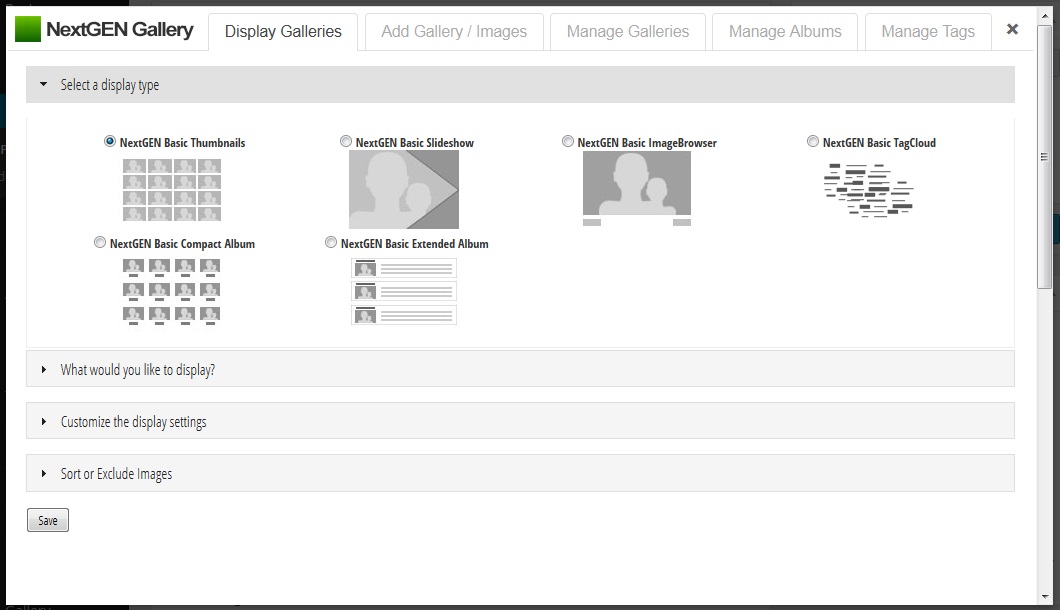
There are a few steps to inserting a gallery. First, you must select the display type. This will determine how the gallery images are displayed on the page (thumbnails, slideshow, browser, etc.).
Next, you will select what to display. You can select a gallery, an album, or choose to display a select number of random images.
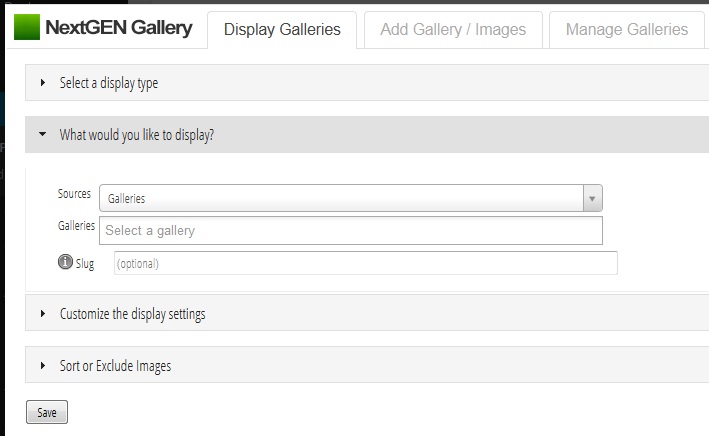
The next two are pre-determined by the main settings which should already be setup. You can over-ride those settings here if you wish to display the images differently than elsewhere on your site.
Creating an Album
Albums are just a collection of galleries. To create a new one, click “Manage Albums” from the left menu:
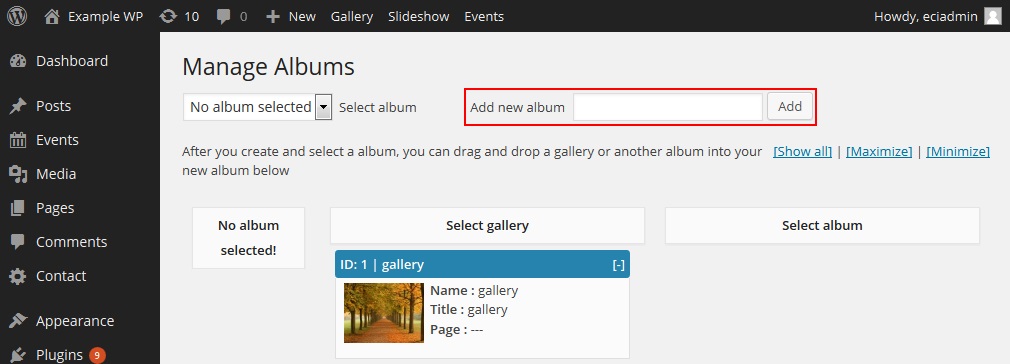
Type the name of the new album in the field marked in red and click “Add”. This will create the album and automatically select it.
To add a gallery to the album, drag a gallery you have created over into this new album and click “Update” to save.
Events
In the left menu on the dashboard, usually right under Posts, you will see Events. Under Events are the selections for creating, viewing and editing events.

The events are handled basically the same as your Posts or Pages. Clicking Events in the list will bring up a list of all the events that have been created. You can hover to bring up options like: View, Edit, Delete.
You can create new events by clicking Add New and creating the event by giving it a Title, Description, and all the other necessary information (time start, time end, date, location, etc.). There are fields for all of these on this edit screen.
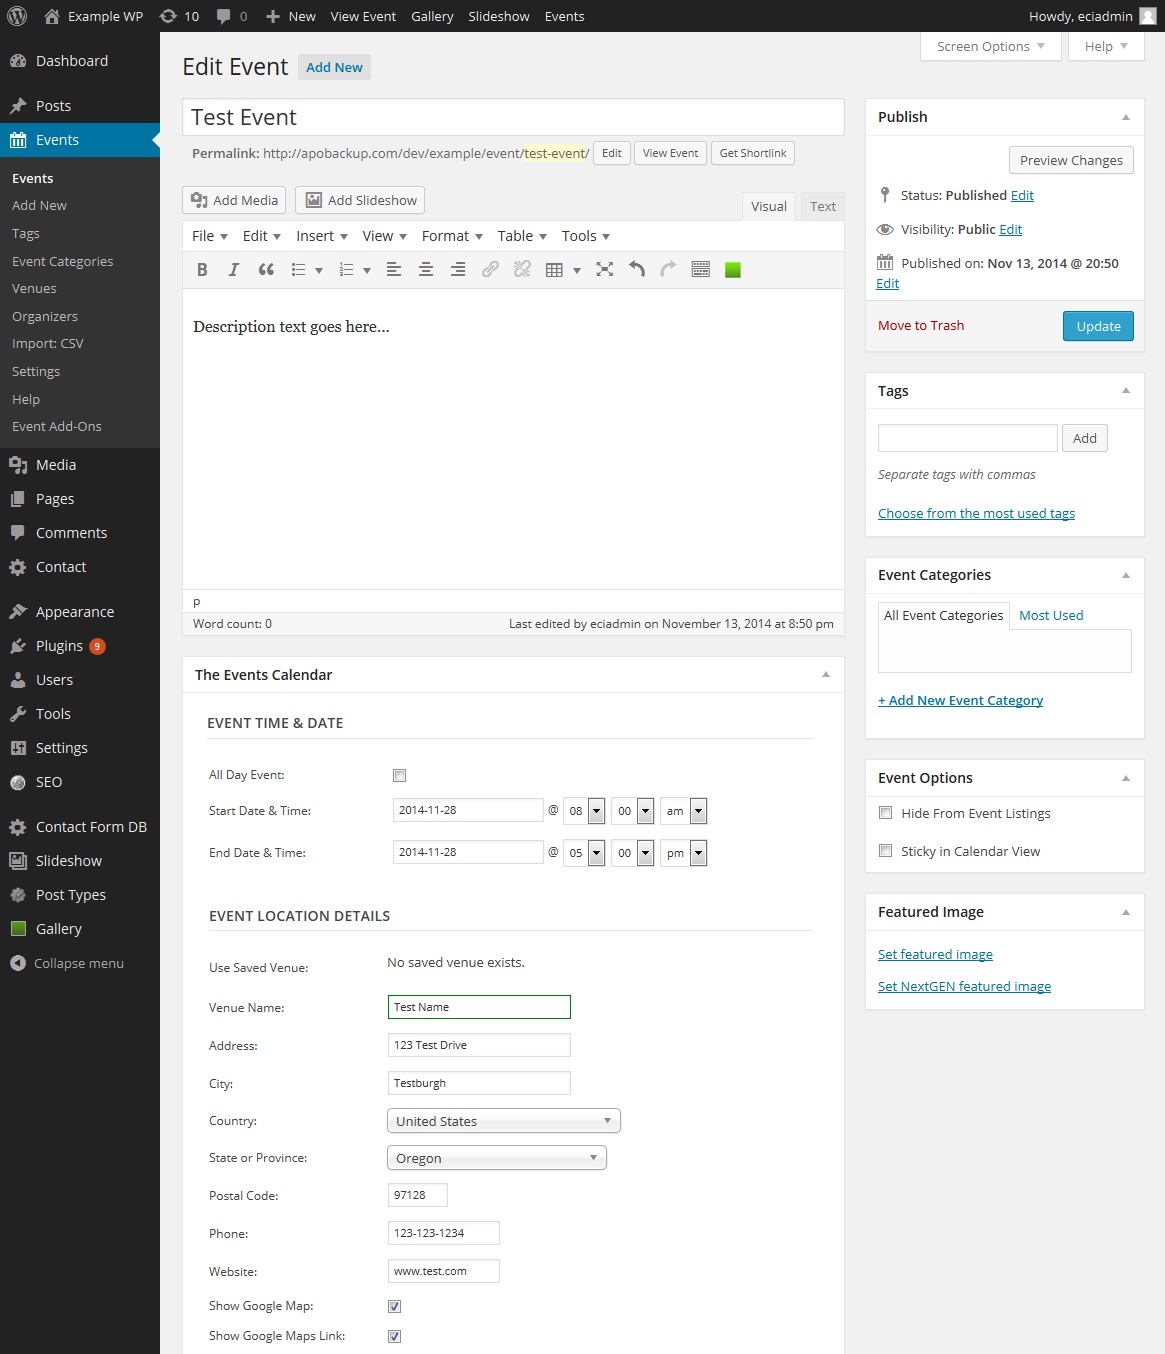
Just fill in all the information you want for the event, and click Publish when you’re ready. You can always go back in and edit them at any time.
Contact Form Database
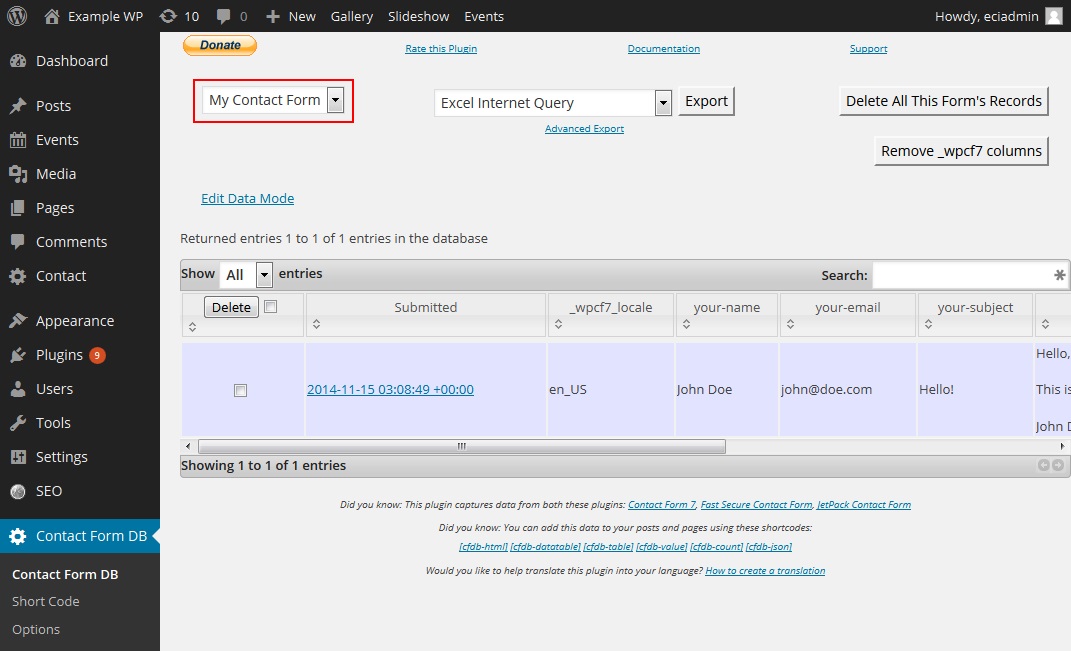
All submissions to the forms on your site are saved in a database and can be viewed or exported. To access the saved form submissions, go to Contact Form DB in the left menu.
Here you can view all the submissions and their content, as well as export all the submissions into a spreadsheet or document. The two best options will be either an Excel spreadsheet “Excel CSV (UTF8-BOM)” or a Google Doc “Google Spreadsheet”. Select the one you want and click “Export”. This will bring up an option to save the spreadsheet to your computer.
